Wednesday, March 21, 2012

Add new number sequence to existing AX module


To demonstrate this I have creted new form “Method table” which stores some of the characteristics of the items so I have added this Method table to Invent module.
Key for this table is “MethodId” & we are going to create number sequence for this table.

Look out the following steps to add number sequence for newly created form/table in existing module of AX 2009
1.   Create New EDT (Extened data type), i.e “MethodId” of type “str” size “20”.
2.   Find Number sequence class, in this case it is “NumberSeqReference_Inventory”.
3.   Find “LoadModule” method, add following code at the end of the method.


4.  Create Following method to Form’s (The Form on which you have added data source) method.
NumberSeqFormHandler numberSeqFormHandler()
{
    if(!numberSeqFormHandler)
    {
        numberSeqFormHandler = NumberSeqFormHandler::newForm(ItemMethodTable::numRefMethodId().NumberSequence,
        element,ItemMethodTable.dataSource(),fieldnum(ItemMethodTable,MethodId));
    }
    return numberSeqFormHandler;
}


5.  Add folloing code to specified methods on the Form where you have added created table.
-          In Write Method
After super() write, element.numberSeqFormHandler().formMethodDataSourceWrite();
-          In Create Method
Before super() write,
       element.numberSeqFormHandler().formMethodDataSourceCreatePre();
After Super write,
element.numberSeqFormHandler().formMethodDataSourceCreate();
-           In delete Method
Before super() write,
      element.numberSeqFormHandler().formMethodDataSourceDelete();
           6. Now, you are done with code part, to give final touch go to, basic> Setup> Number Sequence and run       Wizard. To show up your created Number sequece in List.

That’s it. Enjoy DAXing J


Multiple (Auto + Manual) Number Sequences in AX 2009 & AX 2012


Usecase
Some of the customers want to use multiple number sequence for single table that is not currently available in AX 2009.
i.e. In invent module to create different types of items one required to use different sequence, here  addon comes into picture.

Technical Section
Create new class “NumberSeqDialog” and add methods as listed below.
class NumberSeqDialog extends RunBase
{
    NumberSequenceCode      parentCode;
    NumberSequenceCode      selectedCode;
    DialogField             dialogFieldNumberSeq;
    Dialog                  dialog;
}
public Object dialog()
{
    ;
    dialog = super();
    dialog.caption("Select number sequance");
    dialog.allowUpdateOnSelectCtrl(true);

    dialogFieldNumberSeq = dialog.addField(TypeID(NumberSequenceCode),"Select Number Sequence: ");

    return dialog;
}

public void dialogPostRun(DialogRunbase _dialog)
{
    ;
    _dialog.formRun().controlMethodOverload(true);
    _dialog.formRun().controlMethodOverloadObject(this);
    super(_dialog);
}

Below method will give you answer  of populer question
“How to override Control’s event method?”
Also gives you an idea of
“How to create lookup field on Dialog?”
public void Fld1_1_lookup()
{
    Object control = dialog.formRun().controlCallingMethod();
    ;
    NumberSequenceTable::lookupNumberSequenceCode(control, this.parmParentCode());
}

public boolean getFromDialog()
{
    ;
    this.selectedNumberSeqCode(dialogFieldNumberSeq.value());
    return true;
}

Below to method say, if you don’t want to use “pack unpack” create me like this!!!
container pack()
{
    return connull();
}
boolean unpack(container _packedValues)
{
    return true;
}

NumberSequenceCode parmParentCode(NumberSequenceCode _parentCode = parentCode)
{
    parentCode = _parentCode;
    return parentCode;
}

NumberSequenceCode selectedNumberSeqCode(NumberSequenceCode _selectedCode = selectedCode)
{
    selectedCode = _selectedCode;
    return selectedCode;
}

Modify NumberSequenceTable table

Add below fields to NumberSequenceTable
 “NumberSequenceParent” to set parent Number sequence. EDT, which will refer to NumberSequenceCode.
“Search for parent” to NoYes type enum field.
So finally it will look like,


 Modify “NumberSeqFormHandler” class
Create instance of above class in “NumberSeqFormHandler” class.
Put below code in to newForm method

   if(NumberSequenceTable::find(_numberSequenceCode).SearchForParent)
    {
        numberSeqDialog = new NumberSeqDialog();
        numberSeqDialog.parmParentCode(_numberSequenceCode);
        if(numberSeqDialog.prompt())
        {
            _numberSequenceCode = numberSeqDialog.selectedNumberSeqCode();
        }
    }

So after adding above code your newForm method will look like,

static NumberSeqFormHandler newForm(NumberSequenceCode      _numberSequenceCode,
                                    ObjectRun                 _callerForm,
                                    FormDataSource          _formDataSource,
                                    fieldId                 _fieldIdNum,
                                    boolean                 _dontThrowOnMissingRefSetUp = false
                                   )
{
    NumberSeqFormHandler numberSeqFormHandler;
    NumberSeqDialog      numberSeqDialog;
    ;
    if (!_formDataSource || !_fieldIdNum)
        throw error(strfmt("@SYS70841",funcname()));

    //<Intech>
    if(NumberSequenceTable::find(_numberSequenceCode).SearchForParent)
    {
        numberSeqDialog = new NumberSeqDialog();
        numberSeqDialog.parmParentCode(_numberSequenceCode);
        if(numberSeqDialog.prompt())
        {
            _numberSequenceCode = numberSeqDialog.selectedNumberSeqCode();
        }
    }
    //</Intech>
    numberSeqFormHandler = NumberSeqFormHandler::construct(_formDataSource);

    numberSeqFormHandler.parmNumberSequenceCode(_numberSequenceCode);
    numberSeqFormHandler.parmFormDataSource(_formDataSource);
    numberSeqFormHandler.parmFieldIdNum(_fieldIdNum);
    numberSeqFormHandler.parmDontThrowOnMissingRefSetUp(_dontThrowOnMissingRefSetUp);
    return numberSeqFormHandler;
}
Direction of use

First of all you have to decide on which form you want to use multiple number sequence. Let’s say you have chosen InventTable and want to create items on item details page with different number sequence.
Next step is, go to Basic Setup> Number Sequences.  Find which number sequence is currently y in use to create new item. Let’s say its “Inv_60”, Remember this Number Sequence will be treat as BASE or say PARENT  number sequence.

Now, create different number sequences, as I have created “RM_61”, “FG_62” and “SFG_63” . Select  “Inv_60” against these create number sequences.
One more thing required to active this functionality, that is “Search for parent” option must be ticked on setup tab for “Inv_60” number sequence.

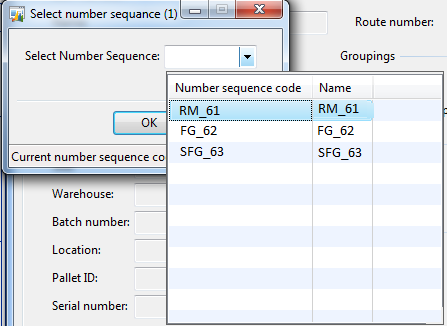
Have you done with all above steps?? If yes, you are ready to use this addon, Just go to Item details page. While creating new item it will search Three number sequences 61 to 63 created above.
and pop up with box shown below.


Select number sequence which you want to use for current item.

Furthermore, you want to give Number manually along with auto number sequence. Just select any of the above (61 to 63) as manually. You will  be having auto + manually number sequences!!!

Any suggestions and questions are Welcomed.

Happy DAXing J

Wednesday, November 16, 2011

How to decide the RunOn property value in Dynamics AX?

While working with Client-Server programming, code placement is crucial to decide otherwise it will results in performance hit. Let's have a look at RunOn property of different AOT objects.

Classes
-     The value of RunOn property for a class will be same as the parent class if the parent class has a RunOn property other than Called from i.e. the RunOn property cannot be changed for a class if the parent class has as its value either Client or Server. 
-     If the parent class has Called from as its RunOn property value, it can be changed to Client or Server and if it is not changed it will retain the inherited value i.e. Called from.
-     The Called from value of the RunOn property means the object will live at the tier where the code creating it (by calling the new constructor) is running.

Methods
-     Class static methods and table methods (except for the database methods) can have their default behavior.
-     The execution place for a method can be changed to Server or Client by adding the Client or Server modifier keywords in the method declaration as shown below:
o    server static boolean mymethod(): to make server the execution place.
o    client static boolean mymethod(): to make client the execution place.
o    client server static boolean mymethod(): to make called from the execution place.

GUI Objects and Reports
-     GUI objects always live on Client. GUI objects include the FormRun, FormDataSource, all FormControls, DialogBox, and OperationProgress objects.
-     Reports always live on Called from, which means the object will live at the tier where the code creating it (by calling the new constructor) is running.

Temporary Tables
-     Temporary tables instantiate and live at the tier where data is first inserted and it does not matter where they are declared. Since the placement of temporary tables is very critical for performance, temporary tables should live at the tier where they are used. If a table is utilized in more than one tier then it should live on the tier where the greatest number of inserts and updates are performed.

Queries
-     QueryRun has called from as the default value of the RunOn property. The QueryRun should always be supplied from the same tier from where it was originally run.
-     If you want to create a new QueryRun in place of an old one, it should be created on the same tier where the old QueryRun was executed.

Tuesday, April 5, 2011

Calculate Cost Price & Sales Price of BOM item.


To calculate Cost and Sales Price of BOM item we have two options as explain below.
      1) Use Cost specified in cost field on Item Details card. 
         2)     Use “Active cost” specified using costing version.

Let’s go with 1st approach first.
  • To use Cost price specified on Item Details Card use Costing Version of type “Planned Cost” also specify fallback = Active or particular version.
Let’s have one example.
> Create one item 005, type = BOM, Costing Version = TestCost(Planned Cost Type)
> Create two item to use as bom line for 005,
> Which are 005Line1 & 005Line2, type = item, Costing Version = TestCost(Planned Cost Type).
> Attach this two item to 005 as bom lines, Activate & Approve BOM.
> Now, for item 005 press “Price” button it pops up window, then press “Calculate” button it again pops up another window select Costing Version TestCost, Site, BOM Version. Also select Fallback version = Active.
Press ok button, this calculates Cost Price & Sales Price as you wanted.

Now here is the way to calculate price with 2nd approach.
  • To use Costing Version of type “Standard Cost” first Active price of (components) which are used to make BOM item. Then select the cost version in which you have activated price while calculating price. In this case fallback is not necessary.
Let’s have one example.
> Create one item 006, type = BOM, Costing Version = StdCost(Standard Cost Type)
> Create two item to use as bom line for 006,
   Which are 006Line1 & 006Line2, type = item, Costing Version = StdCost(Standard Cost Type).
> Attach this two item to 006 as bom lines, Activate & Approve BOM.
> Now press “Price” button for 006Line1 & Active cost value for StdCost Version.
> Again press “Price” button for 006Line2 & Active cost value for StdCost Version.

> Finally press “Price” button for 006 it pops up window, on that window press “Calculate” button. It pops up another window select Costing Version StdCost, Site, BOM Version. Also select Fallback version = None.
> Press ok button, this calculates Cost Price & Sales Price as you wanted.

Tuesday, December 7, 2010

Production Parameters at Shop Floor Control - Screenshots,

Follow the screen shots given below to setup parameters at SFC>Setup>Production>Production Parameters. 

NOTE: This Post is related to previous post "How to configure SFC?" To see descreption of shop floor control clickhere.


Production Parameters - Screenshots,

Follow the screen shots given below to setup parameters at Production>Parameters in order to work with SFC.
NOTE: This Post is related to previous post "How to configure SFC?" To see descreption of shop floor control clickhere.


Friday, December 3, 2010

How to configure Shop Floor Control ?

To configure SFC, go through following steps.

In order to work with SFC first check license availability from the following location.
            Administration Module :-       Setup>System>Licence Information.

If everything is ok, start with following basic setup

1. Shop Floor Control > Setup > Groups > Calculation groups
2. Shop Floor Control > Setup > Groups > Approval groups
3. Shop Floor Control > Setup > Indirect activities
4. Shop Floor Control > Setup > Payroll > Pay types
5. Shop Floor Control > Setup > Payroll > Pay periods
6. Shop Floor Control > Setup > Groups > Absence groups
7. Shop Floor Control > Setup > Production > Production parameters
8. Shop Floor Control > Setup > Profile > Profile
9. Shop Floor Control > Setup > Profile > Profile group
10. Shop Floor Control > Setup > Payroll > Pay agreements
11. Human Resources > Places > Employees
12. Shop Floor Control > Setup > Employee

After basic setup it’s time to decide Scheduling Method suitable to you.

To decide which Scheduling you are going to use and select level of production order planning at:

Shop Floor Control > Setup > Production > Production Parameters

A.    Select Route if you use MRP II (Material Resource Planning) and want to plan production orders only on dates. At this level, production orders consist of operations.
B.     Select Job if you use MRP III and want to be able to plan production orders on a more detailed level using date and time. At this level, production orders consist of operations and jobs connected to each operation.

If the company uses job scheduling when planning production jobs, as described in step B use the same number sequence as is used for job identification in the Production module.
Click Production > Setup > Parameters. 

On the Number Sequences tab, if you are using JOB Scheduling set this sequence number at 
SFC > Setup > Parameters. On Number Sequence tab.

Now to make everything work we need to setup “Parameters” this is crucial step from practical point of view!

First take look at Shop floor control parameters.
For default setup in this parameter form only NumberSequence is needs to be setup.
To see screenshot of Parameters at Production clickhere.

Secondly go through Parameter setup at Production module.
Start tab:
Update Start On-Line = "Status + qty" or "Status". Must tick "Use shop floor control parameters"

Operation tab:
As specified in 1, select job level. Tick Setup & process check box

Report as finish:
Update Start On-Line = "Status + qty" or "Status". Must tick "Use shop floor control parameters"

To see screenshot of Production parameters at Shop floor control clickhere.
NOTE: Specify proper journal name for PickingList, Route and Report as finish in all tab. 
Any wrong journal name will lead to no job list at Registration form.

Happening

Upgrade from AX 2012 to Latest Dynamics 365 Finance and Operation

Below are the steps defined by sequence. 1. Create new Upgrade project in Dynamics LCS. 2. Create VSTS Project and connect it with L...

Trending now