Showing posts with label AX 2012 R2. Show all posts

Tuesday, April 30, 2019

Address column Formatting in LogisticsPostalAddress table AX 2012


Issue/behavior

We have noticed that some of the records in table LogisticsPostalAddress column Address stores actually %1 instead of Country/Region.

If we review Address column using table browser, we might not able to notice this behavior due to PostLoad method on LogisticsPostalAddress table.

To review this, either comment method below in PostLoad method or review using SSMS.
DirUtility::replaceAddressToken(this);

What can be the issue due to this behavior?

1. When we are using this field for the integration, this will pass on %1 to other system.
2. To Print address on reports, if we are using bulk operation (Insert_Recordset) instead of row by row (while select) operation, it will show %1 on report/print.

Can we handle this behavior without code? - Yes

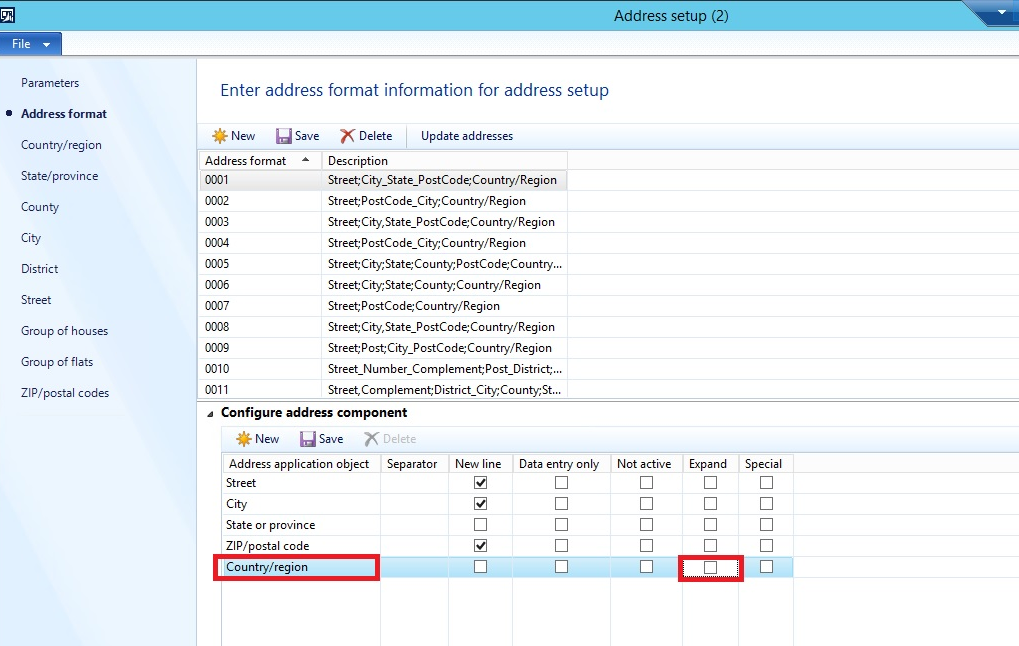
When we have selected Expand option in address format – DAX will store %1 instead of Country/Region in Address column of LogisticsPostalAddress address. 
BUT
If we have not selected Expand option in address format – DAX will store Country/Region Code instead of %1. i.e. CA instead of CANADA, so wherever we refer this field it will pass on CA instead of CANADA


Let me know, if you have any more inputs for the same.


Friday, February 22, 2019

num2Str example AX 2012/Dynamics 365

Below is sample example for the function num2str

static void dtformatNum(Args _args)
{
    real lineNum = 5.69;
    int d = 0;
    ;
    while ((d < 10) && (lineNum != str2num( num2str(lineNum,1,d,1,0) ) ))
        d++;

    info(num2str(lineNum, 1, d, 1, 0));

}

Enum String functions AX 2012

Enum to String conversion using label values.

str dtGetZeroValueReasonCode()
{
    DictEnum        dictEnum;
    int             valueIndex;
    int             enumId;
    str             labelId; 
    str             reasonCode;
    ;

    enumId      = enumNum(rdZeroWeightReasonCode);
    dictEnum    = new DictEnum(enumId);

    if (dictEnum)
    {
        for (valueIndex = 0 ; valueIndex < dictEnum.values(); valueIndex++)
        {         
            labelId = dictEnum.index2LabelId(valueIndex);
            reasonCode += strFmt('%1;',SysLabel::labelId2String(labelId) ? SysLabel::labelId2String(labelId) : dictEnum.index2Label(valueIndex));
        }
    }

    // Remove the trailing ";" if it exist
    if (reasonCode != "")
    {
        reasonCode = strDel(reasonCode,strLen(reasonCode),1);
    } 

    return reasonCode;
}

retrieve enum name from string

zeroWeightReasonCodeStr = zeroWeightReasonCodeElement.innerText();
zeroWeightReasonCode = str2Enum(zeroWeightReasonCode, zeroWeightReasonCodeStr);

Tuesday, July 26, 2016

Import Contoso Demo Data to Dynamics AX 2012

For AX 2012 demo data is available at partner source Link (Partner or customer source login required).

Now, demo data is available in executable file DynamicsAX2012R3DemoData.exe.

To import demo data,
Microsoft Dynamics AX 2012 Test Data Transfer Tool is required Link (Partner or customer source login required).

If above link does not work to download tool, login to Dynamics LCS & look for Downloadable tools as below.


If above both is available follow steps below to import data.
It is recommended that you follow below process on DB Server.

Step 1:
Extract the demo data files from DynamicsAX2012R3DemoData.exe to a specific location.
Note:
It is suggested that extract it to database server local drive – for better performance.
Also make sure that at least 40GB Space is available.

The output folder will contain the files of following extension types:
1.                  .OUT - data file that contains metadata for AX transactional database
2.                  .OutModel - data file that contain metadata for AX model database
3.                  .XML - data file that contains AX table data.

Step 2:
 Run the Test Data Transfer Tool.exe file to install the utility. Note path where this tool gets installed. 
 

After successful installation, the folder will look like as shown below:

Step 3:
Open AX client and import the .XPO named (MetaDataXMLGenerator.Xpo) from the path you have installed Test Data Transfer Tool.

On successful import a job will be created as shown below:

Step 4:
Run the job <MetadataXMLGenerator(usr)>, a  meta data file will be generated. Path will be displayed in the infolog after job execution completes as shown in the snapshot below:
If you lost Infolog, open Run and type %temp%, there you get Metadata.xml

Step 5:
Copy the metadata file from the above path and paste it in [lists] folder (where Test Data Transfer Tool has been installed- Step 2). Overwrite the file already exists.

Step 6:
Stop MS Dynamics AX service.

Step 7:
Open command prompt using administrator and navigate to the path where the Test Data Transfer Tool is installed. This must be installed on Database server to avoid errors.

Step 8:
Run the following command:
Dp.exe Import “C:\R3DemoData\DynamicsAXR3DemoData” DAX2012R3 “Contoso\SQL2012”
i.e.
C:\R3DemoData\DynamicsAXR3DemoData: update the path (Demo Data extracted path)
DAX2012R3: update the database name. (AX Business Database Name)
Contoso\SQL2012: SQL Server Instance name, where database is attached.

If you do not specify [Server], it will always looking for current machine.

In case of standalone you will get the following screen after execution of above command.


If we enter ‘Y’, then following screen will open up describing the count for importing the table data and Error (if they come up)


The process may take time depending upon machine configuration.
At the end,
On successful import, Open AX client and data will show up.
Also, you may notice some errors count, you can review that error from DPLog file from installation folder as below.


Troubleshoot the issue related to this tool: (Good comments are posted with errors and resolutions).

Wednesday, January 6, 2016

Dynamics AX Demo Solutions and License files.

Are you searching for Demo Solutions for Dynamics AX.

Below mentioned link can help you.

AX Demo solution and license file - Link  (requires partner source login).


Demo license file is being updated by MS team yearly, which will be used for Dynamics AX AOS.


Friday, March 6, 2015

Error unable to compile "xxx,xx+xx,xx"

Today I got weird error to solve, which shows error message Unable to compile "100,00+12,00".


While opening TAX form from Purchase line this error occurred as below.


Actually, the culprit was function evalbuf, which is part of AX framework.

This function evaluates formula string. The limitation of this function is that we must use "." as decimal separator in formula string.

In our case the decimal separator was "," so evalbuf was throwing error "unable to compile" with expression passed as shown in above image.


To solve error, I have used strReplace function from global class which replaces "," to "." in the formula string.

Wednesday, March 4, 2015

Error "An unexpected error has occurred while opening the workflow. See the event log on the AOS and contact your system administrator to resolve the issue" on creating the workflow.

To resolve mentioned error we have following options.

Solution 1:
Do incremental CIL compile.

Not succeeded?!

Solution 2:
Do full CIL compile.

Still not succeeded?!

Solution 3:

Stop AOS service.

Rename XppIL folder to XppIL_old. form the following location.
<Drive letter>:\Program Files\Microsoft Dynamics AX\60\Server\<Instance Name>\bin

Start AOS service.

Do full CIL compilation.

Now your face should be filled with SMILE :)

Have any question?! Please comment.

Wednesday, March 21, 2012

Multiple (Auto + Manual) Number Sequences in AX 2009 & AX 2012


Usecase
Some of the customers want to use multiple number sequence for single table that is not currently available in AX 2009.
i.e. In invent module to create different types of items one required to use different sequence, here  addon comes into picture.

Technical Section
Create new class “NumberSeqDialog” and add methods as listed below.
class NumberSeqDialog extends RunBase
{
    NumberSequenceCode      parentCode;
    NumberSequenceCode      selectedCode;
    DialogField             dialogFieldNumberSeq;
    Dialog                  dialog;
}
public Object dialog()
{
    ;
    dialog = super();
    dialog.caption("Select number sequance");
    dialog.allowUpdateOnSelectCtrl(true);

    dialogFieldNumberSeq = dialog.addField(TypeID(NumberSequenceCode),"Select Number Sequence: ");

    return dialog;
}

public void dialogPostRun(DialogRunbase _dialog)
{
    ;
    _dialog.formRun().controlMethodOverload(true);
    _dialog.formRun().controlMethodOverloadObject(this);
    super(_dialog);
}

Below method will give you answer  of populer question
“How to override Control’s event method?”
Also gives you an idea of
“How to create lookup field on Dialog?”
public void Fld1_1_lookup()
{
    Object control = dialog.formRun().controlCallingMethod();
    ;
    NumberSequenceTable::lookupNumberSequenceCode(control, this.parmParentCode());
}

public boolean getFromDialog()
{
    ;
    this.selectedNumberSeqCode(dialogFieldNumberSeq.value());
    return true;
}

Below to method say, if you don’t want to use “pack unpack” create me like this!!!
container pack()
{
    return connull();
}
boolean unpack(container _packedValues)
{
    return true;
}

NumberSequenceCode parmParentCode(NumberSequenceCode _parentCode = parentCode)
{
    parentCode = _parentCode;
    return parentCode;
}

NumberSequenceCode selectedNumberSeqCode(NumberSequenceCode _selectedCode = selectedCode)
{
    selectedCode = _selectedCode;
    return selectedCode;
}

Modify NumberSequenceTable table

Add below fields to NumberSequenceTable
 “NumberSequenceParent” to set parent Number sequence. EDT, which will refer to NumberSequenceCode.
“Search for parent” to NoYes type enum field.
So finally it will look like,


 Modify “NumberSeqFormHandler” class
Create instance of above class in “NumberSeqFormHandler” class.
Put below code in to newForm method

   if(NumberSequenceTable::find(_numberSequenceCode).SearchForParent)
    {
        numberSeqDialog = new NumberSeqDialog();
        numberSeqDialog.parmParentCode(_numberSequenceCode);
        if(numberSeqDialog.prompt())
        {
            _numberSequenceCode = numberSeqDialog.selectedNumberSeqCode();
        }
    }

So after adding above code your newForm method will look like,

static NumberSeqFormHandler newForm(NumberSequenceCode      _numberSequenceCode,
                                    ObjectRun                 _callerForm,
                                    FormDataSource          _formDataSource,
                                    fieldId                 _fieldIdNum,
                                    boolean                 _dontThrowOnMissingRefSetUp = false
                                   )
{
    NumberSeqFormHandler numberSeqFormHandler;
    NumberSeqDialog      numberSeqDialog;
    ;
    if (!_formDataSource || !_fieldIdNum)
        throw error(strfmt("@SYS70841",funcname()));

    //<Intech>
    if(NumberSequenceTable::find(_numberSequenceCode).SearchForParent)
    {
        numberSeqDialog = new NumberSeqDialog();
        numberSeqDialog.parmParentCode(_numberSequenceCode);
        if(numberSeqDialog.prompt())
        {
            _numberSequenceCode = numberSeqDialog.selectedNumberSeqCode();
        }
    }
    //</Intech>
    numberSeqFormHandler = NumberSeqFormHandler::construct(_formDataSource);

    numberSeqFormHandler.parmNumberSequenceCode(_numberSequenceCode);
    numberSeqFormHandler.parmFormDataSource(_formDataSource);
    numberSeqFormHandler.parmFieldIdNum(_fieldIdNum);
    numberSeqFormHandler.parmDontThrowOnMissingRefSetUp(_dontThrowOnMissingRefSetUp);
    return numberSeqFormHandler;
}
Direction of use

First of all you have to decide on which form you want to use multiple number sequence. Let’s say you have chosen InventTable and want to create items on item details page with different number sequence.
Next step is, go to Basic Setup> Number Sequences.  Find which number sequence is currently y in use to create new item. Let’s say its “Inv_60”, Remember this Number Sequence will be treat as BASE or say PARENT  number sequence.

Now, create different number sequences, as I have created “RM_61”, “FG_62” and “SFG_63” . Select  “Inv_60” against these create number sequences.
One more thing required to active this functionality, that is “Search for parent” option must be ticked on setup tab for “Inv_60” number sequence.

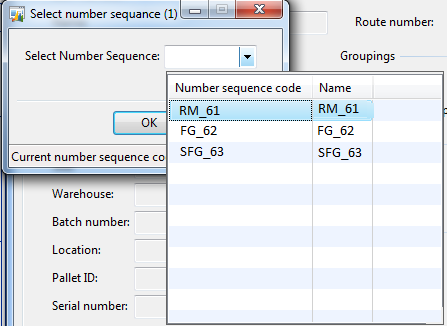
Have you done with all above steps?? If yes, you are ready to use this addon, Just go to Item details page. While creating new item it will search Three number sequences 61 to 63 created above.
and pop up with box shown below.


Select number sequence which you want to use for current item.

Furthermore, you want to give Number manually along with auto number sequence. Just select any of the above (61 to 63) as manually. You will  be having auto + manually number sequences!!!

Any suggestions and questions are Welcomed.

Happy DAXing J
Wednesday, November 16, 2011

How to decide the RunOn property value in Dynamics AX?

While working with Client-Server programming, code placement is crucial to decide otherwise it will results in performance hit. Let's have a look at RunOn property of different AOT objects.

Classes
-     The value of RunOn property for a class will be same as the parent class if the parent class has a RunOn property other than Called from i.e. the RunOn property cannot be changed for a class if the parent class has as its value either Client or Server. 
-     If the parent class has Called from as its RunOn property value, it can be changed to Client or Server and if it is not changed it will retain the inherited value i.e. Called from.
-     The Called from value of the RunOn property means the object will live at the tier where the code creating it (by calling the new constructor) is running.

Methods
-     Class static methods and table methods (except for the database methods) can have their default behavior.
-     The execution place for a method can be changed to Server or Client by adding the Client or Server modifier keywords in the method declaration as shown below:
o    server static boolean mymethod(): to make server the execution place.
o    client static boolean mymethod(): to make client the execution place.
o    client server static boolean mymethod(): to make called from the execution place.

GUI Objects and Reports
-     GUI objects always live on Client. GUI objects include the FormRun, FormDataSource, all FormControls, DialogBox, and OperationProgress objects.
-     Reports always live on Called from, which means the object will live at the tier where the code creating it (by calling the new constructor) is running.

Temporary Tables
-     Temporary tables instantiate and live at the tier where data is first inserted and it does not matter where they are declared. Since the placement of temporary tables is very critical for performance, temporary tables should live at the tier where they are used. If a table is utilized in more than one tier then it should live on the tier where the greatest number of inserts and updates are performed.

Queries
-     QueryRun has called from as the default value of the RunOn property. The QueryRun should always be supplied from the same tier from where it was originally run.
-     If you want to create a new QueryRun in place of an old one, it should be created on the same tier where the old QueryRun was executed.

Happening

Upgrade from AX 2012 to Latest Dynamics 365 Finance and Operation

Below are the steps defined by sequence. 1. Create new Upgrade project in Dynamics LCS. 2. Create VSTS Project and connect it with L...

Trending now